Friday, September 4, 2009

Reset the menus

Tools-> Customize-> Customize dialog box-> Options tab
Click " Reset menu and toolbar usage data"

Create or delete a custom menu

To create a custom menu:

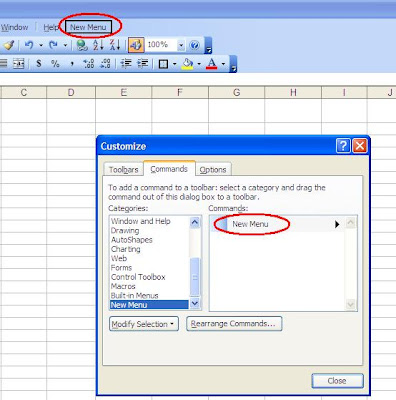
Tools-> Customize-> Customize dialog box-> Commands tab
Categories list-> New Menu
Drag New Menu form the Commands list to the desired position on the menu bar


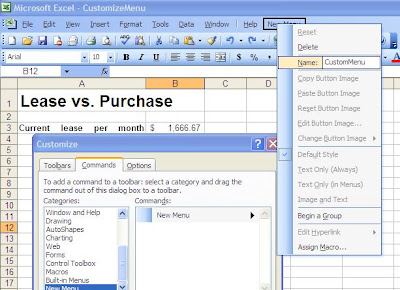
Right-click New Menu and then type name in the Name box


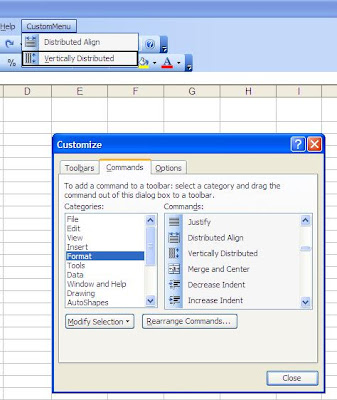
In the Commands list, click the command you want
Drag the command up to the menu bar and over the new menu

To delete a custom menu:

Tools-> Customize-> Customize dialog box
Right-click the custom menu-> Delete

Create a custom toolbar

Open customize dialog box
  • Tools-> Customize
  • Right click any toolbar-> Customize
  • Toolbar Options button-> Add or Remove Buttons-> Customize
Click "New"


Click the "Commands" tab
In the commands list, click the command you want and drag it to the new toolbar

Display, hide, or reset toolbar buttons

At the right end of the toolbar, click the "Toolbar Options" button
Click the " Add or Remove Buttons"
Click "Reset Toolbar" to restore to the default settings


Friday, April 24, 2009

Tuesday, March 31, 2009

Validating data entry

Data validation enables you to define a set of rules that guide data entry for a specific range of cells.

Validation rule specifies
  • Data types
  • Acceptable values
  • Input message
  • Error-alert message

Thursday, March 12, 2009

Editing a Hyperlink

Right-click the cell with hyperlink-> select Edit Hyperlink-> click the "Screen Tip" button-> Set hyperlink screen tip dialog box

Inserting a Hyperlink to a Workbook

Insert-> Hyperlink

Wednesday, March 11, 2009

Turning on the AutoRepublish Feature

This feature republishes the Web page automatically whenever the workbook is saved.

Click the " AutoRepublish every time this workbook is saved" check box

Click the " Open published web page in browser" to have Excel launch your Web browser automatically

Selecting Elements to Publish

After clicking publish button on Save As dialog box -> Publish as Web Page dialog box
Item to publish-> Choose

To specify a filename for the HTML file: click "Browse" button-> Publish As dialog box

Saving a Workbook as a Web Page

  • File-> Save as Web Page OR File-> Save as-> Save as Type: Web Page
  • Click the "Add interactivity " check box to create an interactive Web page. Leave the check box unselected to create a noninteractive page.
  • To specify the page title: click the "Change Title" button


Previewing a Web Page

File-> Web Page Preview

Converting Excel Workbooks into Web Pages

Excel allows you to create two types of Web pages:
  • Noninteractive Web page
  • Interactive Web page: any changes users make on the Web page does not affect the original workbook, nor do changes last from one browser session to another

Tuesday, March 10, 2009

Merging Two Workbooks

Requirements must be met:
  • The two workbooks must be copies of the same file, which must be a shared workbook.
  • The two workbooks must have different filenames.
  • The two workbooks must either have the same passwords or not be password-protected.
  • The Track Changes feature must be turned on for both workbooks from the time the copy is first made.
  • The tracking history must be kept from the time the copy is first made.

  • Open the workbook into which you want to merge the files
  • Tools-> Compare and Merge Workbooks


Monday, March 9, 2009

Accepting and Rejecting Changes to Cells

Tools-> Track Changes-> Accept or Reject Changes


Tracking Changes to Cells

To highlight the changes:

Tools-> Track Changes-> Highlight Changes


To show the contents of the tracking log:

  • Tools-> Track Changes-> Highlight Changes
  • Click the " List changes on a new sheet" check box
  • A new worksheet " History" appear


Reviewing and Deleting Comments

  • View-> Toolbars-> Reviewing-> Reviewing Toolbar
  • Next Comment button


  • Delete comment button


Resolving Conflcts

A Conflict occurs when users try to save different changes to the same cell.

The last user to save the document sees the Resolve Conflicts dialog box.

Rejected changes are stored in a tracking log to allow users to go back and retrieve wrongly rejected changes.